Packing Tape Ghost Tutorial: Spooky DIY Halloween Decoration
This DIY packing tape ghost will make the perfect addition to your front yard decorations for Halloween. Store-bought Halloween decorations can add up quickly, so this quick DIY packing tape ghost will reduce your cost for decorations as many materials can be found around your house. Read on for the entire step-by-step process for this spooky DIY project!
Materials For The Ghosts:
- Packing tape
- Gift wrapping tape
- Scissors
- Box cutting knife
- Plastic Tarp
- Three broomsticks or something similar and round for easy cutting
- Wire
- Battery-operated holiday lights or glow sticks
- Styrofoam head
- Rubber gloves
- Model or mannequin in full-length shirt
Step 1: Taping the Torso & Arms
Place the broomstick on your model’s back and wrap the packing tape around the person’s torso area- make sure not to get it too tight. Use enough tape that it will keep its form once you remove the model. Tip: Create a few extra tape layers on the broomstick for support.
Additionally, place a broomstick on the back of one arm of your model and start wrapping the arm and upper body to the collarbone area- DO NOT cover the neck with tape. Leave this for your foam head.
 Once the arm and body tape layers are complete, cut up the back of the broom on the person’s back and the arm.
Pull your person out of the tape- you should have your first arm and torso. Pull the cut areas back in and connect with a few tape strips.
Step 2- Securing Torso and Arms
 Next, tape your second arm, again with a stick on the back of the arm. Cut out once done. Also, fit your 2nd arm into the torso and use the packing tape to connect.
Step 3- Taping the Head

Now we’ll start on the head. Grab the foam piece and begin to wrap it in packing tape, avoiding the detailed areas like ears, nose, mouth, and eyes.
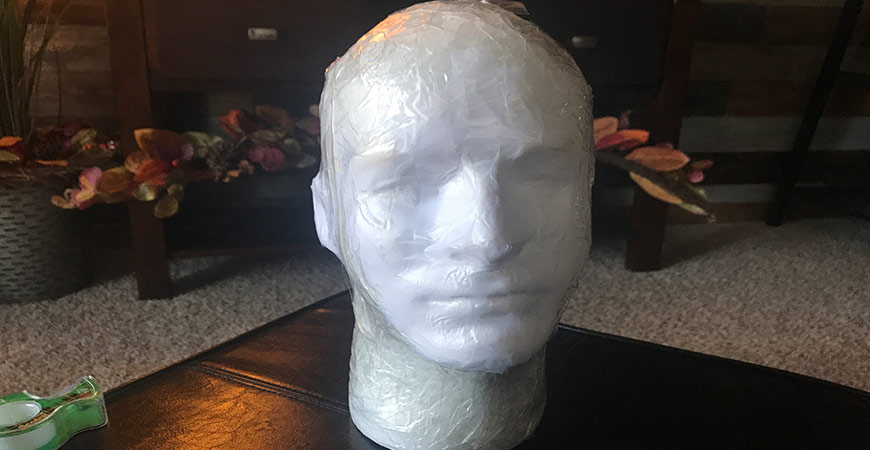
Once all the areas are covered, grab the wrapping tape and work on covering the detailed areas. Be sure to use the tape to mold all the details, such as the eyes. Finally, put a little packing tape around the edges of the wrapping tape areas for extra support.

Cut up the back of your head, from the back of the neck to where the hairline would start on the forehead, with a box cutting knife.
Step 4- Attaching the Head

Once you remove the foam head, make sure all your details, eyes, ears, etc., are correctly formed, and start taping up the area where you previously cut using a few strips of packing tape.

To make it secure, connect the head with your packing tape ghost torso with more packing tape.
Step 5- Complete the Ghost Body

Now you can make legs if you find someone patient enough for more modeling or give your ghost a quick plastic skirt. To create a skirt, cut your plastic tarp into 3 feet-wide strips, gather the plastic, and taping to the inside of your torso. Keep doing this until all sides have a plastic skirt.

Now we want to add hands to our ghost, we used rubber gloves, but you could also use the same plastic to make flowing hands much like the skirt. We added a bit of air to the gloves to give them form, tied a knot, and taped them to the inside of the arms.
Step 6- Displaying the Spooky Ghost

Next, we need to attach a wire hanger to the ghost so we can hang it from a tree. Make a small slit on the top of the ghost’s head with your scissors. Cut off 1’ of wire, twist a loop, and feed it into your ghost body. The twisted section will act as a knot inside your ghost so the wire doesn’t slip through. Make another loop from the cable coming from the ghost’s head. Now you are ready to hang your ghost from the tree.

Use an additional piece of wire to hang from a tree branch.

Lastly, add lights to your ghost- we just taped them inside the packing tape ghost with our wrapping tape. It’s best to do this at night so you can see how it looks while illuminated. You can use Christmas lights or glow sticks for this!
This simple DIY packing tape ghost is sure to impress all the trick-or-treaters on your block! In addition, this spooky ghost decoration will also last many years, thanks to the layers of packing tape.
Happy Halloween from all of us at Wet & Forget!
For more fall DIY projects, check out our blog post here.

Related Posts
 Check Out Our Top 5 Pumpkin Carving Tips
- Spice up the Season with these 30 Fall Front Door Ideas
- Get Crafty With These 3 DIY Wall Decor Ideas
- Enjoy the Changing Seasons with These Popular Fall Patio Decorating Ideas
- DIY PVC Bird – An Easy Yard Decoration Tutorial
- 5 Perfect Pumpkin Carving Tips to Make your Gourd Outshine the Rest!