DIY Easter Decorations Made Quick & Easy
Spring is officially here! Although the weather may not seem quite warm enough for spring, the Easter holiday is just around the corner.
Welcome family and friends to your home with these three simple DIY Easter decorations.
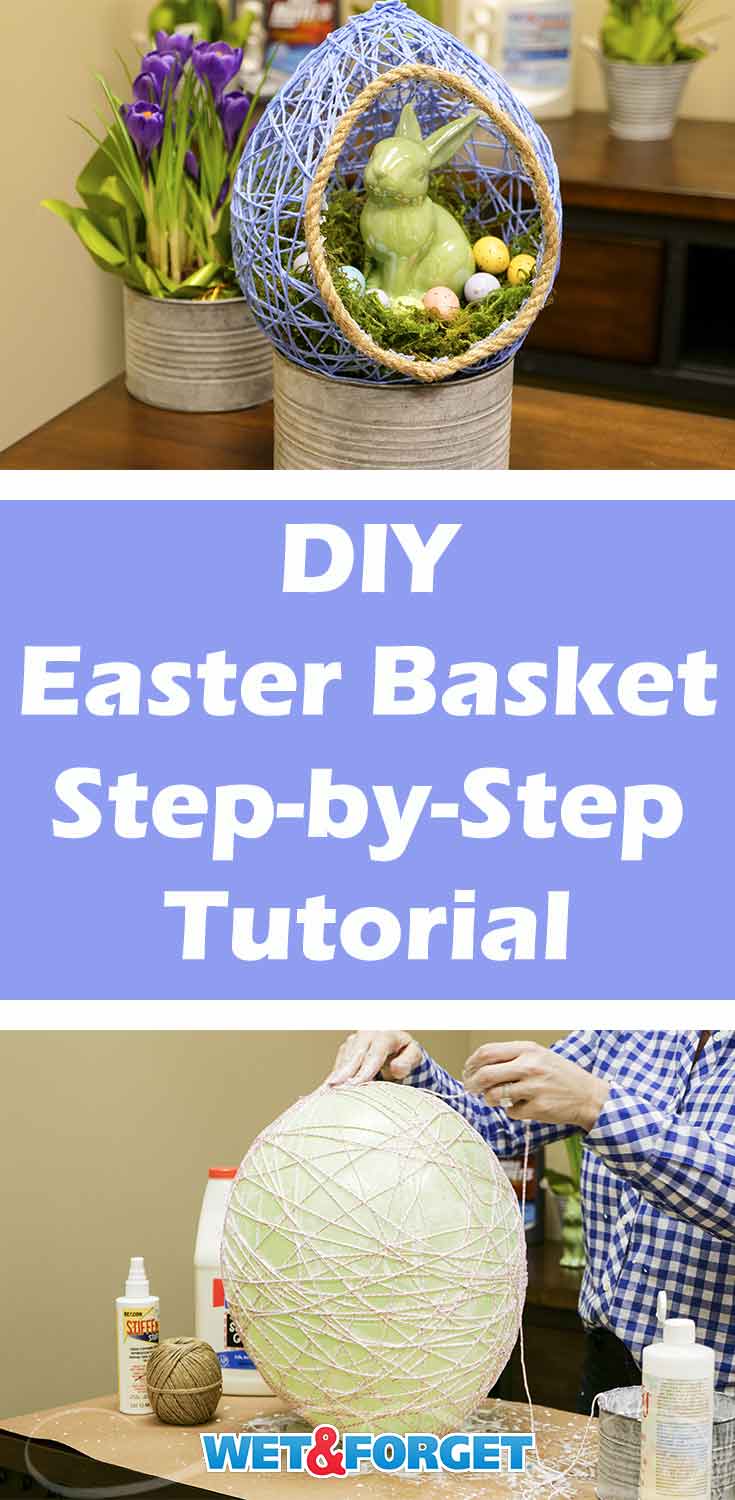
DIY Balloon Easter Basket

Instead of using tacky store-bought Easter baskets to decorate, create your own with our craft tutorial! You can pick out the color of the Easter basket and personalize it with your own decorations.
This DIY Easter basket is a great project to work on with kids too!
Materials:
- Balloons
- Pins
- Blunt Large Eye Needle
- Colorful String
- Small bucket
- Scissors
- Modge Podge (can substitute with 1 part glue: 1 part water)
- Fabric Stiffener Spray
- Decorative Rope (optional)
- Faux Moss (optional)
- Rabbit Statue (optional)
- Plastic Eggs (optional)
Step 1: Blow Up the Balloon

Create the base for your DIY Easter basket by blowing up a large balloon. Blow air into the balloon until a large egg shape forms. Tie off the balloon and set it aside.
Step 2: Preparing the String

Put your spool of colored string into a bucket. Fill the small bucket halfway with modge podge. Let the string soak in the solution for a few minutes. The modge podge coated string will hold the shape of your Easter basket.
Step 3: Wrapping the Balloon
 Tie the modge podge-soaked string to the balloon tie. Start to wrap the colorful string around the balloon to create an egg shaped base.
This step is a great way to craft with your kids and get them involved before Easter. Your hands may get a little messy- but it’s totally worth it!

Continue to wrap the string around and across the balloon until it almost looks like a spider web. The more crossing of the strings, the better, as this creates the basket’s egg structure.
Step 4: Spray Away!

Spray the string and balloon evenly with a fabric stiffener. This will help hold the string into the egg shape after the balloon is popped. Let the balloon and string dry for 24 hours.
Step 5: Pop the Balloon!

Pop the balloon with a pin and allow the air to drain from the balloon. You may need to pop the balloon from two different places so that the air can drain more quickly from the balloon.
Step 5: Cutting the Basket

Cut an oval shape into the basket. This will be the opening of your basket to display your Easter decorations. After this, cut out the balloon that remains inside the basket.
Step 6: Decorate and Personalize your Basket!

Decorate both the inside and outside of the basket to your liking. We used a hot glue gun to attach the rope around the basket’s opening to make the edges smooth and give the basket a farmhouse look.
We then stuffed the basket with faux moss. Then we added a statue of a bunny and a few Easter eggs to help celebrate the season.
Statues of chicks and other baby animals make excellent decorations for this DIY Easter basket. If you’re using this Easter basket as a place for the Easter bunny to deliver gifts, leave the Easter basket empty or fill it with faux moss.
DIY Burlap Easter Bunny

Give your home an authentic farmhouse Easter look with this DIY burlap bunny. Even if your sewing skills aren’t the best, you can make this bunny with a few simple steps!
Materials:
- Burlap
- Black Marker
- Blunt Large Eye Needle
- Scissors
- Pins
- Colorful String
- Rope
- Bunny Template
- Faux Moss
- Extra Large Pom Pom
- Craft Paper
Step 1: Trace the Outline

First, fold your burlap in half, so you can trace and cut out two bunnies to sew together. Place your template onto the burlap and pin it, so the template stays in place.
Next, trace the template with a marker. There are many templates of bunnies online that will make the perfect outline to trace onto the burlap.
Step 2: Cut out the Bunny

Use a few pins to hold the two layers of burlap together so the two layers will be even. Cut out your bunny along the outline you traced.
Be sure to cut a little further in so you do not have any remaining marks from the marker on the burlap.
Step 3: Sewing and Stuffing

Thread your needle with colorful string. We used a pink and white string to go with spring colors. Sew the two cutouts together with 1-inch stitches at least a 1/2-inch away from the edge to avoid fraying.
Be sure to leave a little room between the stitches to create a border around the edge. Stuff it with small pieces of craft paper and add the final few stitches to the bunny.
Step 4: Decorate and Display!

There are so many options when it comes to adding decorations to your bunny! We cut out faux moss to make a collar for it and attached small Easter eggs with hot glue.
We also hot glued a big fluffy tail onto the bunny. Lastly, we hot glued a rope at the top to hang the Easter decoration and glued a rope bow to the bunny to give it a more farmhouse look. After adding these final touches, your Easter decoration is ready to be displayed!
This DIY burlap bunny looks great hanging on a door or a wall.
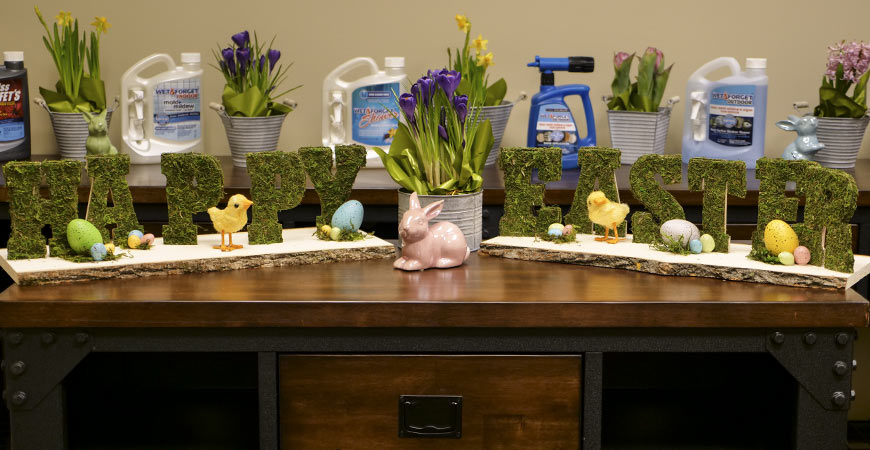
Moss Happy Easter Sign

Let mother nature help decorate your home this spring with this moss Easter sign! This DIY Happy Easter sign can be displayed in your front foyer or on your countertop to welcome friends and family to your home.
You call get all of the materials to make this at your local craft store.
Materials:
- Wooden Letters
- Scissors
- Marker
- Hot Glue Gun
- Roll of Moss
- Wood Base
- Bag of Loose Faux Moss
- Decorative Easter Eggs & Chicks
Step 1: Tracing

On the backside of the roll of moss, trace each wooden letter face down using a black marker. Make sure you do not trace the letter face up; otherwise, the letters will be backward.
Step 2: Cut out Letters

With a pair of scissors, carefully cut out each letter from the roll of moss.
Step 3: Glue Letters

Use a hot glue gun to attach the moss to each wooden letter. Let the hot glue dry until it has cooled completely.
Step 4: Assemble the Sign

Stand each letter up and place it on the wooden bottom to get an idea of where you want each letter to be. Next, use hot glue to attach each letter to the wood. Hold the letter in place until the glue has secured the letter in place.
Step 5: Finishing Decorative Touches

Cut out a few small strips of moss and hot glue them onto the edges of each letter. The extra moss will hide any excess wood that may be sticking out. After this, hot glue Easter eggs to the board, then glue bits of loose faux moss onto the board around the Easter eggs to your liking.
You can also glue a chick or bunny to the base for a festive look. Allow the glue to dry completely then your DIY Easter sign is ready to display!
Get extra hints and tips with our DIY Easter tutorial video below.
All three DIY Easter craft projects will give your home a modern seasonal look for the Easter holiday. The Easter basket project is a great craft to make with kids, then get the Easter bunny to surprise them with gifts on Easter Sunday.
The burlap bunny is an easy way to start to sharpen your sewing skills and create a nifty door decoration. This project also uses a blunt large eye needle, making it a good project for kids to begin to learn how to sew.
Finally, the moss Happy Easter sign will welcome guests and is a simple way to add some greenery to your home.