Contemporary and Industrial DIY Shelving Units
Shelving units can be expensive and usually use the same boring designs. Why use store-bought shelves when you can make them yourself? We created a list of our favorite DIY shelves to install in your home.
In this list, we included a DIY industrial or urban shelving unit (pictured above) made out of a pipe one of the employees created. We also included the full instructions on installing each shelf in your home!
1. DIY End Table Shelves

Infarrantly, Creative’s stacked end table shelves are a creative way to make new use of old furniture! She cut her old end table in half and painted it a new color to match her home.
Next, she installed brackets on the bottom of the table so they could be properly attached to the wall. Then, she stacked these tables on top of each other to create a whole wall shelving unit.
These unique shelves are a great way to re-purpose old furniture and have a stylish new shelving unit!
2. DIY Hanging Bathroom Shelf
This DIY hanging bathroom shelf makes a great addition to any room. This shelf is smaller, so it can easily fit into any space.
Since it is a hanging shelf, you don’t need to put multiple holes into your wall to complete this look. The materials needed to create this shelf are white wood or pine wood, wood screws, wood glue, rope, and a hook.
These wooden shelves are perfect for storing bathroom toiletries or adding interesting home décor to your bathroom. A quick coat of paint can drastically change the look of the shelves, and the right color can be a nice compliment to the existing color scheme of your home!
3. DIY Crate Shelving Unit
Tara Michelle’s DIY crate shelving unit recycles old wooden crates to create a bookshelf! These shelves make great storage units for your home!
She includes a step-by-step tutorial to achieve the exact look that she has mastered. This rustic-looking bookshelf can be adorned with home decorations (such as flowers, pictures, knick-knacks..etc.) or to store different collections.
This DIY bookshelf would work nicely in a child’s bedroom as well. Furthermore, add a little paint to match the theme and use it to store toys or books to help keep the room nice and tidy.
Overall, this bookshelf unit can be used in so many ways that it’s a must-have for storage in your home!
4. DIY Industrial Pipe Shelving Unit
Adam is not much of a mechanic or DIYer but wanted to find a shelving unit to consolidate his vintage camera collection. He did some research on Pinterest and devised a plan to create a pipe shelving unit to hold his camera collection.
These shelves create an urban look for your home and make a beautiful addition to any room. Check out his step-by-step process of making these DIY shelves below!
He divided up the materials into three groups so you can see what materials you need to make these shelves:
Wall Unit:
- 32 Risers
- 26 Shelf Pipes
- 8- 24″ Threaded Pipes
- 4 Nipple Fittings
- 24 Caps
- 28 Tees
- 4- 90 Degree Street Elbows
- 8 Flanges
- 4- 1″ Nipples
- 4 Unions
Center Section:
- 6- 18″ Threaded Pipes
2 of each material below
- 26″ Threaded Pipes
- Unions
- 90 Degree Street Elbows
- 1″ Nipples
- Flanges
- Caps
Lights: 2 of each material (optional addition)
- Pipes
- Degree Street Elbows
- PVC Nipples
- PVC Caps (Drilled)
- Replacement Lamp Sockets
Shelving Boards:
- 12- 51″ by 8″ oak boards
- 1- 13 ft. by 8″ oak board
Stain: Rusto-leum® Varathane Weathered Grey
Polyurethane: Matte Finish

-
Paint the Pipes
Adam first fully scrubbed out the pipes with acetone to remove the paint to be ready for a new coat of paint. This step of scrubbing out the pipes is no longer necessary, as Adam realized after creating the shelves.
You can find the pipes for your shelves at a low price from your local hardware stores.

Next, he sprayed the pipes with Rust-oleum® Universal® metallic black spray paint to achieve his desired metal black color. This step is optional, but picking out a spray paint color of your choice can help personalize your shelving unit so it will fit in with the colors of your home.

-
Assemble the Shelves
Once the spray paint was dry, Adam started to twist the pipes together for the wall unit. Pictured, you can see a flange twisted into a tee pipe attached to two piping pieces to create the bottom left corner of the shelving.
He plans to add felt under the flange to prevent it from scratching the floor. Most of this shelving unit requires simply twisting the different pieces of piping together. You will also need to anchor the top flanges into the wall to hold the shelf in place.

-
Stain the Shelves
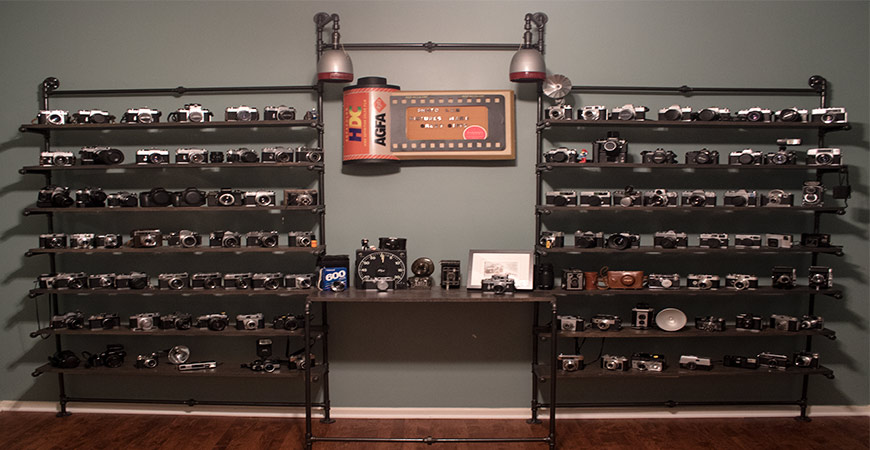
Here’s the completed pipe shelving unit against the wall. Adam cut 12- 51″ by 8″ pieces of oak wood for the smaller shelves. Then, he cut 1- 13 feet by 8″ shelf to run across the entire unit.
After organizing the wooden boards onto the shelves, Adam decided to stain the wood so the shelving unit would blend in with the rest of the room.
-
Add Lights
Pictured above, you can see the stained boards across the shelving unit. He also added lights on the top of the shelving unit by threading the wires into the pipe.
He used these lights to give the area more character to fit in with the photography theme of this room. Currently, the lights are non-functional but make great décor next to his cameras.
 In the picture above, you can see a close-up of Adam’s vintage cameras on the stained wooden shelf on the piping unit. The color of the shelves contrasts nicely with the cameras because the color of the piping matches the majority of the vintage cameras.
This shelving unit completes an urban-style look for any room. And it allows you to show off your treasured collection.
Any of the listed shelving units would make gorgeous and handy additions to your home. Whether you’re going for a rustic look or a modern look, we listed a variety of the most functional and stylish shelving units.
Additionally, each shelving unit can be altered in painting or design to fit in with your home.
That’s the beauty of DIY shelving units; you can always personalize your projects to your liking.
Interested in more DIY home décor ideas? Click Here!
(Photo Courtesy of Infarrantly Creative)


Related Posts
 Backyard DIY Projects that Won’t Break the Bank
- Transform your Old Dresser with this Step-by-Step Video!
- Home Improvement Projects to Leave to the Professionals
- 12 Headboard Ideas That Will Brighten your Bedroom
- 6 Tips on Prepping Walls for Painting
- Clever Can Camo: 5 Creative Ways to Hide your Trash Cans