Fabulous DIY Faux Paint & Gel Stain Finishes for the Modern Home
Need to give your garage door or boring kitchen backsplash a new look? Upgrade your home with a new, exciting look and feel with faux paint or gel stain. Read on if you’re eager to learn more about DIY faux paint or gel stain finishes.
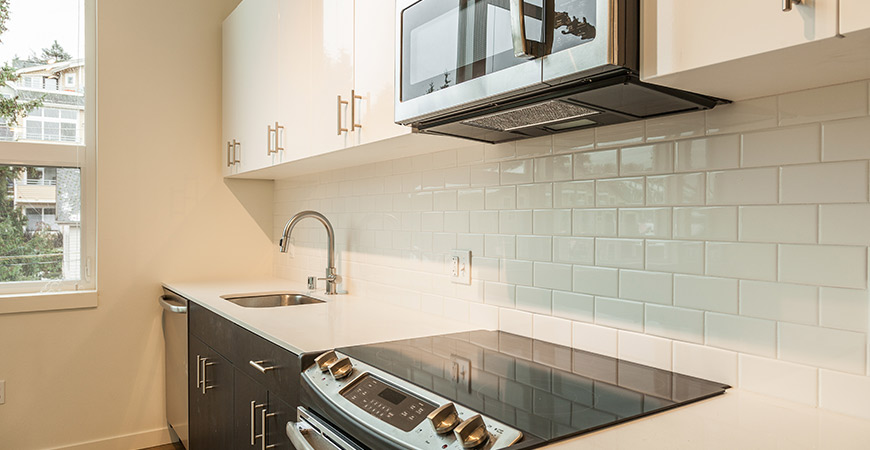
Faux Subway Tile Kitchen Backsplash

This ingenious and simple DIY faux paint finish technique looks just like ceramic subway tile. Perfect for a kitchen backsplash, this small-scale project will add contemporary style to your home!
What You’ll Need
- Screwdriver
- High-gloss white paint
- Flat/matte grey paint
- Painter’s tape (2-3 rolls)
- Paint roller & tray or mini roller kit (for painting trim)
- Small paintbrush
- Cardboard or heavy paper
- Tape measure
- Yardstick
- Long Level
Step 1
Remove all room switch plates and electrical plug covers and clean the walls. If you are painting the kitchen, be sure to clean the walls thoroughly, as cooking grease will keep the paint from sticking. Let dry overnight.
Step 2
When walls are dry, tape off all no-paint edges and borders with painter’s tape, to protect electrical plugs and light switches, put tape on them.
Step 3
Paint two coats of hi-gloss finish white paint-
Use a paint roller to apply a thin coat of hi-gloss white paint to the wall. Allow the first coat to dry on the walls (usually 2 to 4 hours; check the paint manufacturer’s instructions for optimum drying time). Apply a second coat to the wall. Let dry.
Step 4
Create a faux tile template-
Draw a 3-inch by 6-inch rectangle on a piece of heavy paper or cardboard. Cut it out with scissors. You can alter the dimensions to make your faux tile template smaller or larger, according to your work area and preference. You can alter the dimensions to make your faux tile template smaller or larger, according to your work area and preference.
Step 5
Place painter’s tape horizontally on the wall to create faux paint grout lines. (This will require lots of tape!) Use a yardstick as a guide to assist with spacing the faux grout lines. (The spaces between the tiles.) A 1/8-inch width faux grout line is ideal. Use the tile template to check your work as you go.
Check to make sure your faux grout lines are horizontal with a level. Press the tape firmly to the wall to prevent paint bleed. Stand back and look at your work periodically to ensure it’s horizontal and not on a slant.
Mark little arrows on the painter’s tape, pointing to the wall spaces you intend to paint. (It’s easy to get confused with so many horizontal lines on the wall.)
Step 6
After taping all horizontal lines, use a small paintbrush and matte grey paint to paint the faux grout lines. Let the paint dry, then apply a second coat to faux grout lines on the wall.
Step 7
Carefully peel off the painter’s tape off the walls.
Step 8
Begin taping the vertical lines. To create a faux traditional subway tile finish, stagger each ’tile’ horizontally, from one row to the next, using your tile template for assistance. It’s best to tape off the walls all at once- start at one end and work your way around.
Step 9
Check to see if the paint is dry by peeking under the edge of the painter’s tape on the wall. If not, let the finish on the walls dry for a few hours. Then gently peel the tape from the wall.
Faux Wood Gel Stain
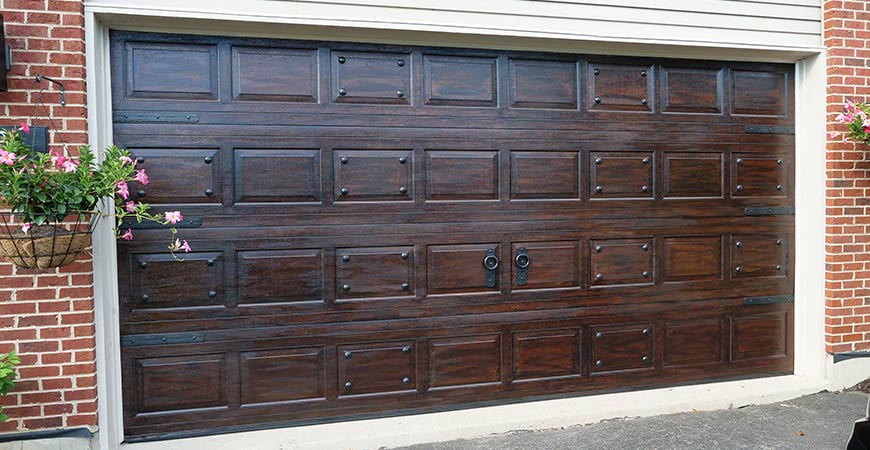
Transform your garage door into a faux wood door with an easy-to-use gel stain finish. This simple DIY project will add depth to your garage door, making all your neighbors think you put in a new garage door. This project costs under $100, whereas replacing your garage door can cost $1,500+!
For this project, you will need three different Minwax gel stains. We recommend getting a base color (brown), a dark color (black), and a light color.
You will also need a medium-width chippy paintbrush, painter’s tape, gloves, a cheesecloth, and magnetic garage door hardware.
Step 1
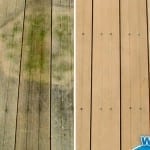
Clean your garage door before applying any gel stain finish. We recommend using Wet & Forget Xtreme Reach™ Hose End to clean your garage door easily. Your garage door may look clean, but there may be growth on the surface that isn’t visible to the eye.
By cleaning the surface first, you’re preventing any growth from being sealed into the garage door.
Step 2
First, tape off the rubber seal around the garage door. Then coat your garage door with the base color (brown) gel stain of your liking. Be sure to cover all the nooks and crannies on your garage door.
Use a cheesecloth to blend the color into the surface. We didn’t paint the cracks between each garage door panel, but feel free to do this. Let the gel stain dry completely.
Step 3
To add depth, paint any indentations in your garage door and panels with black paint. Smear the surface with cheesecloth to blend the color into the base color. Let dry.
Step 4
Apply the light-colored gel stain finish with a cheesecloth. Blend this into the base paint to create a garage door that looks like real wood. Be sure to step back every once in a while to see where the light gel stain needs to be added.
Pro Tip: Gel stain can be hard to remove from your hands. Wash your hands with water and cooking oil and watch the finish peel off easily.
Step 5
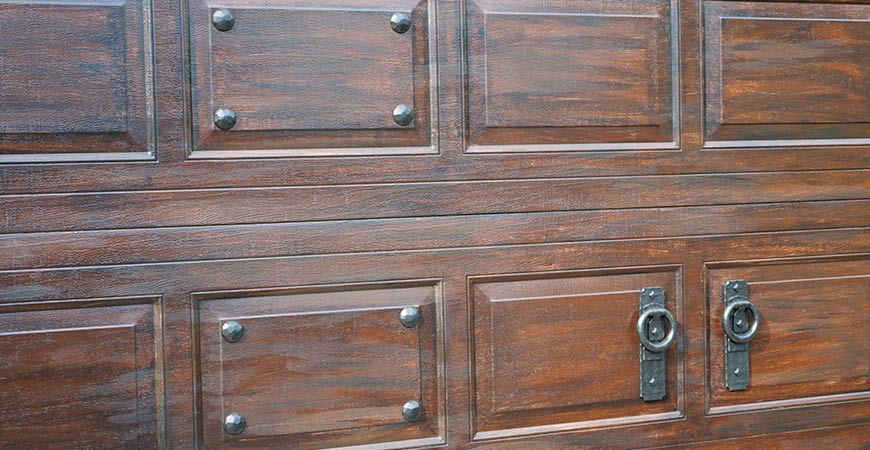
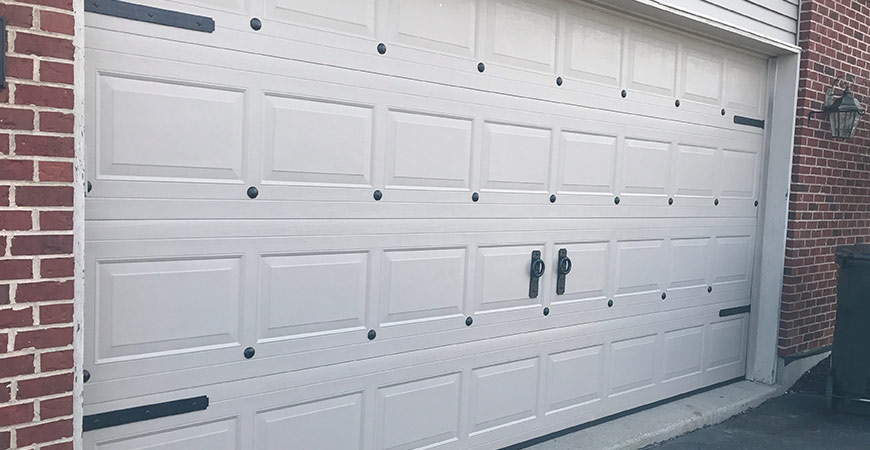
Add the magnetic garage door hardware to your garage door to the areas of your liking. The embellishments will give your garage door a more authentic wood look.
These faux gel stain and faux paint ideas are sure to bring a modern look to your home without spending any extra money hiring painters. After sprucing up your home with one or two of these DIY projects, your home will have the contemporary look you have been striving for.
Want to learn more about home DIY projects? Check out these backyard DIY projects that won’t break the bank.
Interested in ways to keep your home cleaner? Click here.


Related Posts
 Contemporary and Industrial DIY Shelving Units
- Moving? Let Wet & Forget Lend a Helping Hand
- DIY PVC Bird – An Easy Yard Decoration Tutorial
- 12 DIY Ways to Brighten up Your Home this Winter
- Want a Clean Deck? Wet & Forget is Your Answer–No Elbow Grease Needed!
- Handy Bathroom Shower Caulking Tips and How-Tos