Staining Outdoor Wood: Your Ultimate Guide
It’s a question as old as time: do you respect wood? Some may nod “yes” and point to their coaster ownership as evidence. However, the true test of respect is staining outdoor wood. We’re talking decks, fences, siding, and, yes, even furniture. And with the warm weather here, there’s never been a better time to get outdoors and demonstrate your respect.
To see how to apply an outdoor wood stain and avoid the common errors some DIYers commit, check out the rest of our post below.
Why do you need to stain outdoor wood?
Your property’s deck, fences, and other exterior components don’t face an easy life. They’re exposed to harsh elements like sun, snow, and rain. Additionally, decks are trampled on by sandaled feet, while fences and siding often stand bare against winds that carry dirt, pebbles, and other debris. Just a single stormy season can be enough to leave these items dulled and dinged.
Some people may choose to protect their wood with paint or sealants. However, these shields easily peel, and reapplication requires stripping and sanding the wood before refinishing.
That’s why many homeowners turn to wood stains. Stains soak deep into the wood without leaving a film that peels or cracks when exposed to UV rays or moisture. This finish will also bring out the natural beauty of the surface, enhancing its color, grain, and texture.
What types of outdoor wood stains are available?
There are three types of outdoor wood stains:
- Oil-Based
- Water-Based
- Hybrid
Oil-based wood stains
Oil-based stains have a lot going for them. They can cost as little as $25 per gallon, and they’re very durable. In addition, it’s hard to mess up the application process and should result in an even finish.
However, there are two clear downsides to oil-based stains. First, they contain volatile organic compounds. VOCs can be harmful to the person applying the stain and the surrounding environment. While using the stain outside can help disperse these hazardous materials, following all directions and safety recommendations listed by the manufacturer is essential.
Second, oil-based stains are known to attract mildew if misapplied. The risk is exceptionally high in humid or damp environments.
Water-based wood stains
Water-based stains are designed to combat some of the disadvantages of their oil-based counterparts, but there are still some trade-offs. For instance, some water-based stains offer UV resistance or contain zinc. Protection from the sun will help keep the stain from fading, and zinc will help keep mildew and rot at bay.
Also, water-based stains are safe to use and don’t contain VOCs. Soap and water are enough to clean up any spills.
The downside, though, is that the application process can be tricky. Water-based stains don’t soak into the wood as easily, and they tend to dry quickly. If it dries too quickly, you’re likely to have an unsightly and uneven finish. Additionally, water-based stains are more expensive than oil-based ones. A gallon can set you back about $40 to $50.
Hybrid wood stains
Hybrid stains offer the best of both worlds. They are highly durable and safe, like water-based stains. They also soak deeply into the wood, making it easy to apply them evenly. The most significant downside is that hybrid stains tend to be the most expensive option, with prices reaching $75 per gallon.
A note on wood transparency
You can also describe wood stains by their transparency. Knowing how much of the wood you want to show off will help you choose the right one for your needs:
- Clear stains offer no color but can enhance the wood’s natural grain.
- Transparent stains can add a slight accent tint to the wood’s natural color.
- Semi-transparent stains add more color while still keeping the grain visible.
- Semisolid stains begin to conceal more of the wood’s grain.
- Solid (or opaque) stains are almost paint-like in the way they alter the wood’s color.
Can you use the same stain on all of your outdoor wood?
Technically, you can use the same wood stain for all of your exterior wood. However, that probably wouldn’t be the wisest choice.
Your deck, for example, has a large, flat surface area that leaves it more exposed to sunlight and standing water. When you add in all the foot traffic it receives, you’ll need a penetrating, heavy-duty stain that can hold up to the most demanding aspects of its environment. Some finishes are created explicitly for decks, and you may want to look for ones labeled solid or opaque as they are less likely to show visible wear.
The best stain for exterior furniture will depend on whether you’re looking to highlight the natural grain or cover it up. A clear or transparent stain will help protect the wood while still emphasizing its natural grain. However, if the surface is heavily weathered, you may prefer a more opaque stain.
The final factor in picking an outdoor wood stain is knowing whether the wood has already been treated. While you can re-apply a stain over an old one, applying a transparent or semi-transparent stain may not show up as well if the previous stain was opaque.
Finally, if the surface is worn or you want to change the look, a solid will work best. It will mask the grain but help transform its color.
What tools do you need to stain outdoor wood?
You only need a few tools to complete the staining process:
- A power washer is helpful if you need to remove the old finish first.
- A power sander with 60-grit sandpaper will help open up the wood’s pores to maximize how much stain it absorbs.
- An applicator, such as a sprayer or a paint roller, to apply the stain. Sprayers are handy for furniture or areas that are difficult to reach by hand.
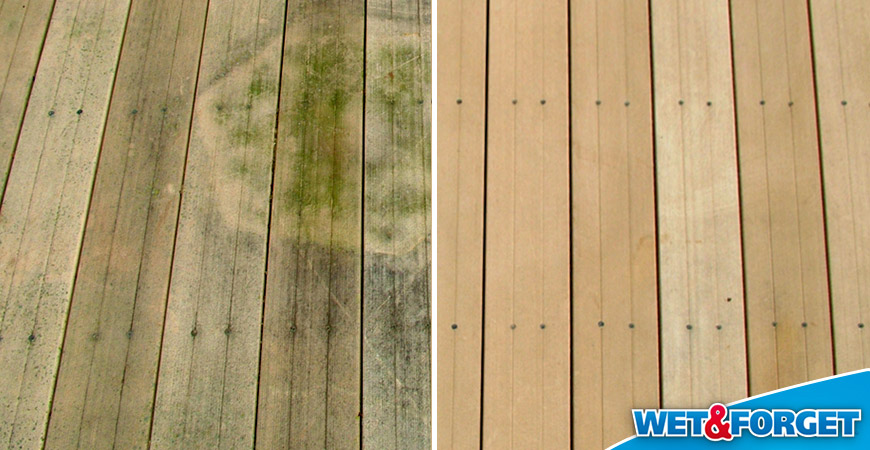
If algae, mold, or mildew stains are present on the wood, you can use Wet & Forget Outdoor as part of your preparation process. As long as the wood is dry, all you need to do is spray it and let the product work with the rain and wind to clean up the green and black stains. The outdoor formula should clear up the green algae within days or weeks. Dark stains caused by mold and mildew can take a few months to fully clean up.
Once the wood is clear of stains, you’ll only need to wait for the wood to dry before applying your stain.
Is staining outdoor wood easy?
With the right tools, staining outdoor wood is something that most DIYers can handle in a day.
However, if you have lots of wood to cover or need additional work done, you can consider hiring a professional. It should cost between $2 and $4 per square foot. This price includes both labor and materials. Of course, the size of the area you’re hiring them to stain, the quality of the stain, and the need for any additional work — like power washing, sanding, or applying an exterior wood stain and seal — will affect the price.
What common mistakes should you avoid when staining outdoor wood?
When it comes to how to stain outdoor wood, understanding how not to is an excellent place to start. So, if you’ve got the right tools and stain, try to avoid making these common mistakes:
Applying too many coats
You only need a coat or two to get the job done.
Not using the right tools
A paintbrush can work for tiny areas or railings, but rollers and spray applicators will speed up the job.
Forgetting to block the area as it dries
After applying the stain, the wood must be left completely untouched for around 24 hours.
Forgoing the test board
Testing the stain on a single board will help you avoid staining the entire area before realizing you want a different color or transparency.
Misjudging the weather & timing
The deck should be dry for at least 24 hours before starting. It’s best to start early as the afternoon sun will dry the stain before it can soak into the wood.
Rushing the job
The area should be cleaned and sanded to allow the wood to absorb the stain. If you’re applying two coats, the wood needs at least four hours to absorb the stain thoroughly.

