How to Maintain Your Overhead Garage Door
A little preventive maintenance can prolong the life of your garage door, saving you costly repair bills. And taking care of doors’ rollers and tracks can prevent excessive wear to the mechanical system resulting in less need for repair.
A quiet, safe, smoothly operating garage door is the goal. Read on for instructions on maintaining and lubricating your automatic overhead garage door.
A once-a-year garage door inspection and tune-up will ensure your door’s safety and reliability. First, be safe by doing the following steps before you begin:
- Put on safety glasses
- Unplug the mechanical door opener from the electrical outlet
- With the door closed, disengage the garage door opener from the door by pulling the emergency release cord
- If you’re working on the door while open, clamp a pair of locking pliers to the roller track, just below a roller. This will keep the garage door from dropping.
Caution: Do not disengage a lift cable while the garage door is under tension. If a cable accidentally releases, it will become a heavy whip that may cause injury.
Also, never release or adjust the tension created by an overhead torsion spring. This is best left to service technicians.
Inspect the door’s hardware-
Over time, any doors with constant movement may have their hardware loosen. Check and tighten all roller brackets on the garage door. And tighten the bolts that hold the rails to the support brackets.
Check the rollers for deterioration-
Plastic rollers– If you have plastic rollers, they can eventually crack or chip. Replace the old rollers by removing and reinstalling the roller bracket.
Steel rollers– If you have steel rollers, the ball bearings can wear out, causing the roller to misalign. If your steel rollers are still in good condition, read below for instructions on how to lubricate them.
Caution: Never remove the bottom roller bracket as the attached cable is under extreme tension.
If necessary, purchase replacement rollers at your neighborhood hardware store.
Inspect the lift cable-
Problems with the lift cable usually occur near the bottom roller bracket. Check the condition of the cable for wear. Use an old toothbrush to remove any built-up grease or dirt from the area. Look for broken strands. (Note: This cable is under high tension. Don’t attempt to replace or repair it yourself- call qualified garage door service technicians.)
How to Lubricate Noisy Garage Doors
To prevent rust, corrosion, sticking, and squeaking, use silicone spray products to lubricate all moving parts of garage doors, including:
- Hinges
- Chains
- Pulleys
- Latches
Note: Avoid spraying the products on the sensor at the bottom of garage doors.
How to Maintain Tracks on Garage Doors
Clean dirty tracks by wiping them down with a wet cloth or a rag sprayed with a little WD-40 or similar products.
Do not lubricate the tracks, as this may prevent the rollers from turning correctly or can cause them to dislodge. Also, lubricants can build up over time, creating a mess.
Lubricating Metal Rollers on Garage Doors
If you have metal rollers, lubricate the ball bearings inside. Attach the straw tube (provided) to the can of silicone spray and liberally spray around the bearings.
Remember, anything you apply to the garage will be above your car when the door is up, so wipe away any excess lubricant. Operate the garage door a few times and wait a few hours before parking your car inside.
Lubricate the Overhead Springs
Prevent corrosion on garage doors by giving the overhead torsion springs an annual spray with oil-based cleaner products like WD-40.
Replacing the Weather Seal at the Bottom of Garage Doors
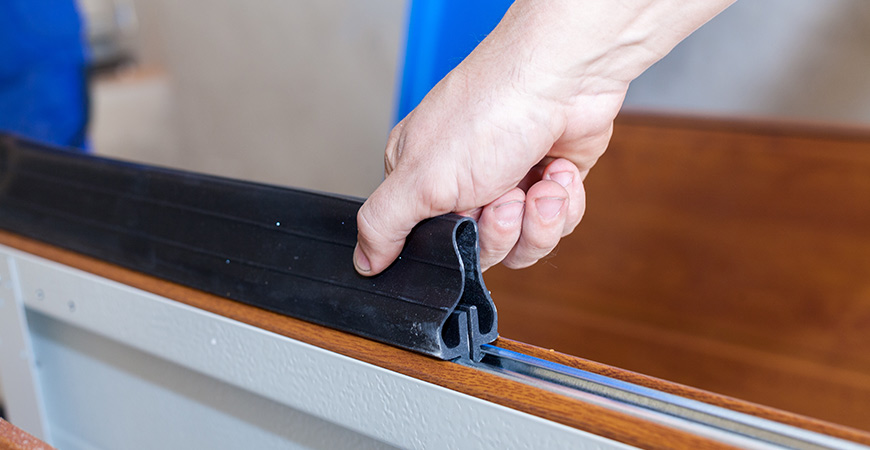
The weather seal (sometimes called an astragal) at the bottom of doors helps to keep your garage warm in winter and cool in summer. It also helps keep insects and debris from getting inside.
Inspect the weather seal at the bottom of the door for tears, rips, and wear. If you see any of these issues, the weather seal on your garage door will need repair.
For Wood Garage Doors
Remove the worn seal with a flat pry bar for wood garage doors. To install a new seal use, 1-inch galvanized roofing nails to attach the seal to one end of the door.
Pull it firmly across the bottom of the garage door and then nail it to the opposite end. Place a couple of nails at the door’s center, then keep the seal aligned; place a nail approximately every 3 to 4 inches. Attach the seal, so the flange’s wide lip is to the garage door’s inside.
For Metal Garage Doors
On most metal garage doors, the seal slides into a 2-channel system. Slide the old weather stripping out of the channel at one side of the door, if possible. If the weather stripping won’t slide, use a screwdriver to pry into the channel to loosen the stripping.
Then try sliding the old stripping out again. Another method is to use a utility knife to cut the weather seal horizontally into two pieces and then slide out each cut section.
Install the new weather stripping
Fold the new stripping into a “U” shape and insert each stripping edge into the two-channel grooves. Then, gently slide it in, holding the stripping horizontally in your left hand, and continuing to hold the stripping in a “U” shape in your right hand.
When you get to the end, slide the stripping 3-4 inches beyond the end of the door, leaving extra stripping. Fold this additional stripping up and over, tucking the excess inside the stripping.
Go back to where you started and trim the stripping about 3-4 inches away from the garage door, leaving extra. Fold and tuck the extra length inside the stripping. Close the garage door and admire your new, perfect seal.
Hint: If you have a problem sliding the new stripping into the channels, spray-on soap-based cleaner. The stripping should easily slide in.
After completing these quick fixes, your garage door will be ready to go! By making sure garage doors are functioning correctly with these check-up services – you’re sure to save some extra money in not needing a repair for a long time.
Interested in more DIY projects? Click here for DIY inspiration for decorating the front of your home.

